NATIVE INSTRUMENTS KONTROL Z2
INSTALLATION
Firmware: Update the firmware of the unit to the latest version from Native Instruments
Drivers: Install the latest drivers from Native Instruments
Controller Editor: Download and install the latest version of Native Instrument’s controller editor software from Native Instruments
Attention: Controller Editor must be installed on your system for the unit to be able to operate as a MIDI/HID controller.
Important notice: While it’s not required, you may also want to load a special Controller Editor profile on your system in order to optimize the visual feedback of the unit’s leds. For more information please visit the following link: Kontrol Z2 CE Template for VirtualDj
VirtualDJ 8 Setup
(in case you have not done already)
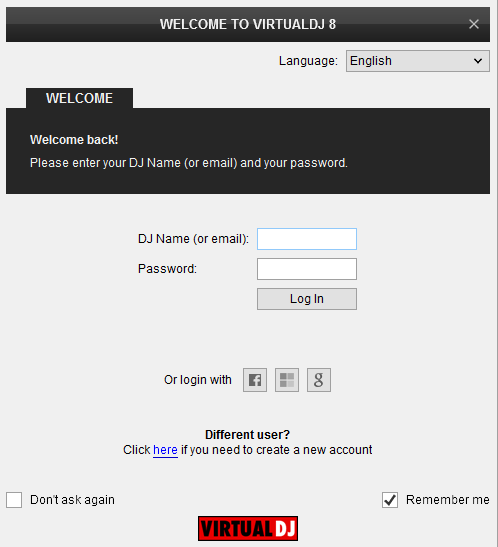
Once VirtualDJ 8 is launched, a Login Window will appear. Login with your virtualdj.com account credentials. A Pro Infinity or a Pro Subscription License is required to fully use the Kontrol Z2.
Without any of the above Licenses, the controller will operate for 10 minutes each time you restart VirtualDJ.
Buy a license
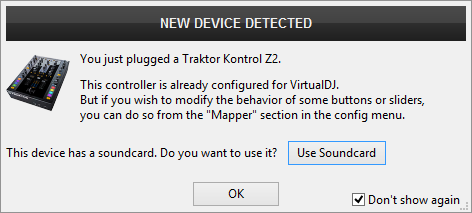
Click to OK.
Advanced Setup
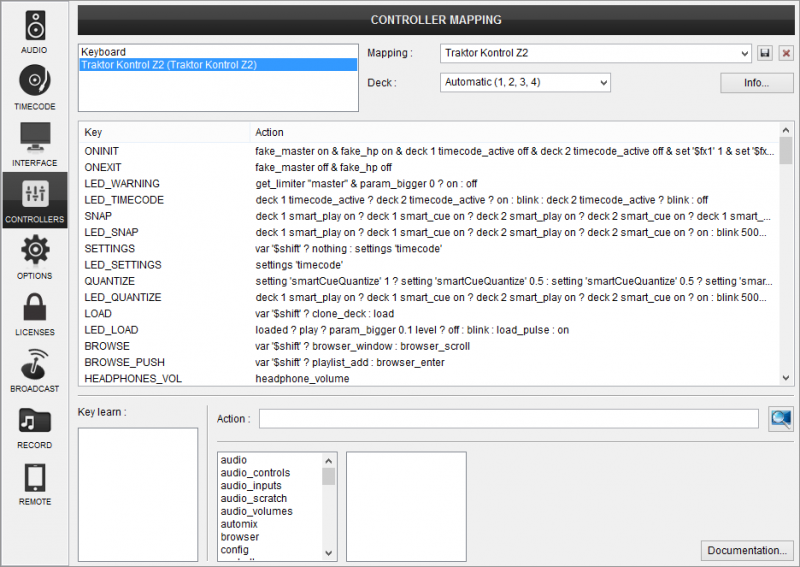
The unit should be visible in the CONTROLLERS tab of Config and the “factory default” available/selected from the Mappings drop-down list. The factory default Mapping offers the functions described in this Manual, however those can be adjusted to your needs via VDJ Script actions.
Find more details at
VDJ Pedia
The unit has a pre-defined Audio setup and a special button in the AUDIO tab of Config to provide that. Alternative Audio setups can be applied in the same window.
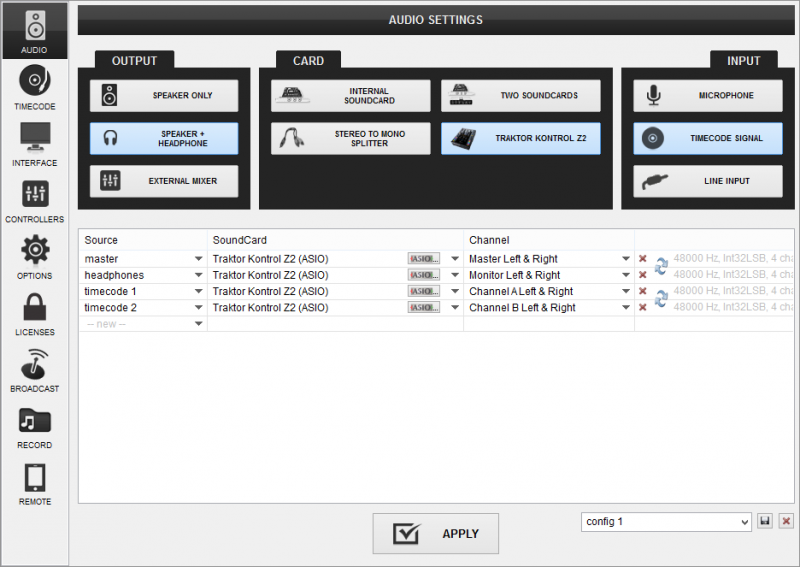
For further software settings please refer to the Manuals of VirtualDJ 8.
LAYOUT
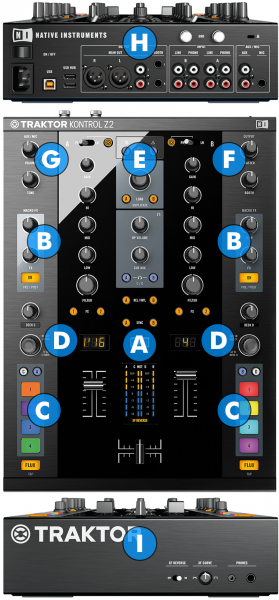
The functionality of each button, knob and slider per section (as shown in the image above) will be explained in detail in the next chapters
Mixer
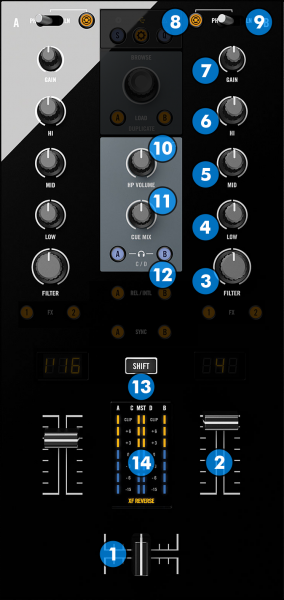
- CROSSFADER: Blends audio between the left and right channels
- VOLUME: Alter the sound of each deck.
- FILTER: Turn this knob to apply a High Pass / Low Pass filter on the sound of the corresponding deck
- EQ-LOW: Adjust the low (bass) frequencies of the corresponding deck
- EQ-MID: Adjust the middle (mid) frequencies of the corresponding deck
- EQ-HI: Adjust the high (treble) frequencies of the corresponding deck
- GAIN: Adjusts the audio level (gain) of the corresponding deck.
- PC MODE: Push this button to toggle each channel between “PC” and hardware mode. When the button is lit the corresponding channel’s controls will control VirtualDJ’s mixer. When the button is unlit, they will control the analog sound inputs of Kontrol Z2.
- PHONO/LINE: Selects the analog source that’s routed to the software for the timecode signal to be captured and the source that’s controlled from the mixer when it’s operating in hardware mode.
- HEADPHONES LEVEL: Adjusts the Headphones (CUE) Output Volume (Hardware operation, but visible on the VirtualDJ GUI).
- HEADPHONES MIX: Adjusts the mixing between CUE and MASTER output sound output on your headphones. All the way to the left is CUE sound output only, all the way to the right is MASTER sound output only.
- PFL: Press this button to send this channel's pre-fader signal to the Cue Channel for monitoring. When engaged, the button will be lit.
- SHIFT: Press and hold this button to access secondary functions of other controls on the Kontrol Z2.
- VU METERS: Displays the intensity of the mono sum of each decks pre-fader volume and the master volume output.
Effects
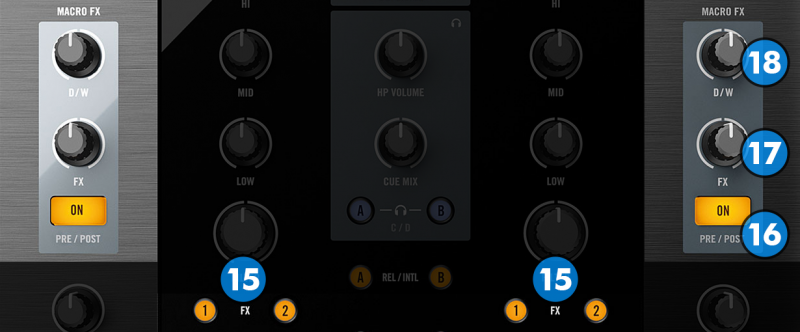
The Left FX section (FX1) controls the effects of the deck 1 and the Right FX section (FX2) controls the effects of deck 2. Use the FX ASSIGN (15) buttons to clone the effects from one deck to another.
- FX ASSIGN: Clone the effects from one deck to anotther.
- FX ON: Activates the selected effect.
- FX SELECT: Selects the current effect.
- FX DRY/WET: Turn this knob to adjust the 1st parameter (if available) of the selected effect
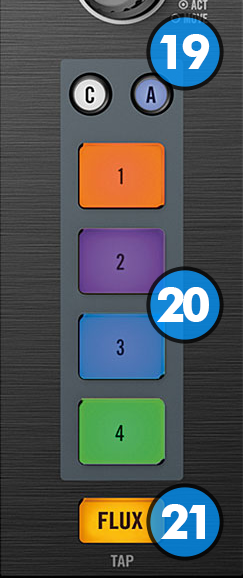
Hotcues
 Hotcues.png)
- HOTCUE BANK SELECT: Press these buttons to select the active hotcue bank for each deck. Buttons A & B select bank 1 for decks 1 & 2 respectively while buttons C & D select bank 2. When bank 1 is selected the hotcue buttons (20) act against hotcues 1-4, while when bank 2 is selected they act against hotcues 5-8.
- HOTCUES: Each one of the 4 buttons assigns a Hot Cue Point or jumps the track to that Hot Cue Point (if already assigned). When a Hot Cue Button is unlit you can assign a Hot Cue Point by pressing it at the desired point in your track. Once it is assigned, the Hot Cue Button will light on. The last used Hot Cue Point will light on white color, while the rest stored Hot Cue Points will light on green color. Hold down SHIFT (13) and then press a button to delete its assigned Hot Cue Point. While SHIFT is held the stored Hot Cue Points will light on red color.
- SLIP: Enables Slip Mode. Several software functions (such as HotCues and Loops) will apply temporarily on the track, and the track will return to the position it would have been if those functions were not triggered. Please note that Slip Mode does not work with Timecode. Hold down SHIFT (13) and then tap this button a few times to manually set a new BPM for the track.
Loops
 Loops.png)
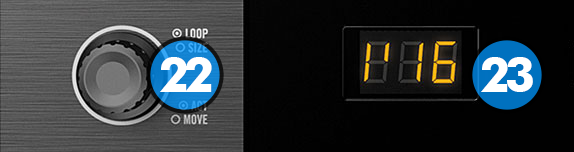
- LOOP: Turn this knob to adjust the size used by automatic loops, or to change the length of the current loop. Hold down SHIFT (13) and turn this knob clockwise (while performing a loop) to move the loop forward in the track. The loop will move as many beats as the current loop. Hold down SHIFT and turn the knob counter clockwise to move the loop backwards in time. The track playing position will jump in order to remain inside the loop at the same position. Press the knob down to activate/deactivate an automatic loop.
- LCD DISPLAY: Shows the size that will be used by automatic loops, or the length of the current loop. When a loop is active the LCD will blink to notify you. When the corresponding channel is in hardware mode, the screen will show the selected analog input (Ph/Ln)
Browser & Other Controls
 Browser - Others.png)
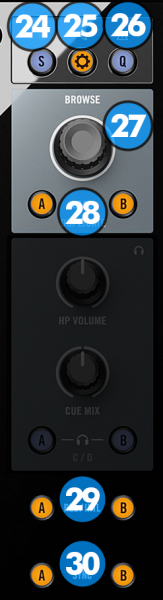
- SNAP: Toggles Smart Play & Smart Cue on/off. When Smart Play & Smart Cue are on, the Play and Hotcue actions will snap to the nearest beat.
- SETTINGS: Press this button to open VirtualDJ timecode settings
- QUANTIZE: Press this button to change the quantize length between 1, ½ and ¼ of a beat.
- BROWSE: Turn this knob to scroll through files or folders. Hold down SHIFT (13) and turn the knob to change the area of the browser that has the focus between folders, songs and sideview. Push the knob down to set the focus on the folders list or open / close subfolders if focus is on the folders list. Hold down SHIFT (13) and press the knob to set the focus on the songs list if the focus is on folders list.
- LOAD: Press one of these buttons while a track is selected to load it on the corresponding deck. Press and hold the same button for more than 1 second, to unload the same deck. Hold down SHIFT (13) and press this button to clone the track of the selected deck to the other deck.
- TIMECODE ACTIVATE: Press one of these buttons to activate timecode processing for the corresponding deck. Press the same button again to turn off timecode and return to internal playback. When timecode is active, these buttons will be lit in amber color. When timecode is inactive (and therefore internal control mode is active) these buttons will be lit in green color. Hold down SHIFT (13) and press these buttons to start/stop the playback of the corresponding deck. If timecode processing is active, it will be deactivated.
- SYNC: Press this button to automatically match the corresponding deck's tempo with the opposite deck's tempo and phase.
Master
 Master & G) Mic-Aux.png)
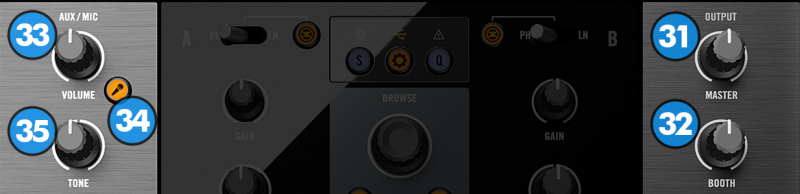
- MASTER LEVEL: Controls the master output volume of the device. This control is hardware operated but its movement is visible in the VirtualDj GUI
- BOOTHLEVEL: Controls the secondary (booth) output volume of the device. This control is hardware operated and its movement is not visible in the VirtualDj GUI
Mic - Aux
 Master & G) Mic-Aux.png)
- MIC-AUX VOLUME: Controls the volume of the mic – auxiliary input of Kontrol Z2. This control is hardware operated and its movement is not visible in the VirtualDj GUI. Please also note that MIC (47) and AUX (46) inputs are hardwired together and you can’t control their volume separately.
- MIC-AUX ON/OFF: Activates/Deactivates the MIC-AUX inputs
- MIC-AUX TONE: Controls the musical tone of the MIC-AUX inputs
Rear

- POWER SWITCH: Turns on/off the power on the device.
- POWER INPUT: Connect the supplied power cord.
- USB CONNECTOR: Use a standard USB cable to connect Kontrol Z2 with your computer.
- USB HUB: Use these USB ports to connect up to two other devices with your PC.
- BALANCED (XLR) OUTPUTS: Use these connectors to connect your device on a PRO grade amplifier or self-powered (active) speakers.
- RCA OUTPUTS: Use these connectors to connect your device on another mixer or consumer grade amplifier.
- BOOTH (TRS) OUTPUTS: Use these connectors to connect your device on your booth monitor speakers or amp.
- CHANNEL 2 INPUTS: Connect a turntable or a CD player to channel 2. You can control which of the two sources gets heard or routed to the VirtualDj’s timecode engine by flipping the PHONO/LINE (9) switch on the top of the mixer.
- CHANNEL 1 INPUTS: Connect a turntable or a CD player to channel 1. You can control which of the two sources gets heard or routed to the VirtualDj’s timecode engine by flipping the PHONO/LINE (9) switch on the top of the mixer.
- GROUND CONNECTORS: Connect your turntable’s ground connectors (if available) to eliminate ground static noise.
- AUXILIARY INPUT: Connect any line level auxiliary source.
- MIC INPUT: Connect your microphone.
Front
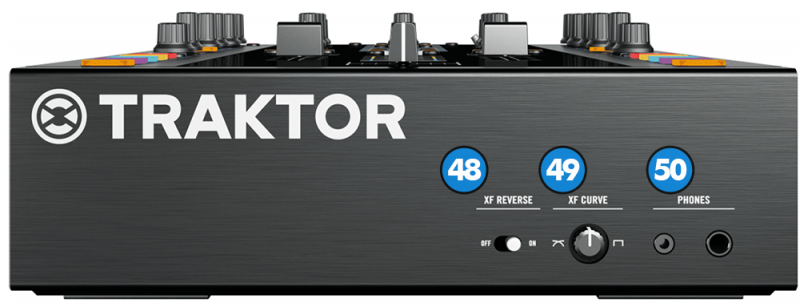
- CROSSFADER REVERSE: Reverses the crossfader (so that left deck is heard when CROSSFADER (1) is all way to the right and vice versa).
- CROSSFADER CURVE: Adjusts the curve of the crossfader. All way to the left is a smooth transition between 2 decks while all way to the right is a fast “scratch” transition.
- HEADPHONES CONNECTOR: Connect your headphones.
